My Sitecore 6 twitter module

For a couple of weeks ago I had fun making a twitter module for Sitecore 6.   The main goal of this module was to show of some of my skills as a Sitecore developer, and i want to share this with you (c:. Her are some of the highlights.

  1. Sitecore scheduled twitter updater task, that manages import of twits from a given Twitter user
  2. All twits are saved as Sitecore Items.
  3. All twits are displayed with a XSLT rendering.
  4. Download the package and the source files(at the end of the article)

Short description of the Sitecore Setup.

The Sitecore Scheduled task is setup to call the twitter manager webform witch gets all new twits from a twitter account which is defined by name in Sitecore. Here you can see it running on my machine
The webform called by the Sitecore scheduled task stores all the new twits as Items in the master database and publishes them to web database. These items are purely meant as data items,  so they have no renderings or layout attached to their template.  All the twit items are placed under the “global” folder item so they can be separated from all the other nondata items like my Twitter page item(described below).

An example off twits items generated by my twitter manager. Every Item is named so it will allays have a unique name.

Twitter manager webform called by the Sitecore, gets it’s twitter username from the Twitter page item, which in my example can be found under the Home root item.

Here you can see the twitter item based on the TwitterManagerPage template. Items based on this template are meant to display all twits from a given user in this case me (c:

Items based on the TwitterManagerPage template has its own icon and device setup.  So they can be used to show a list of twits items stored within the sitecore in the front-end.

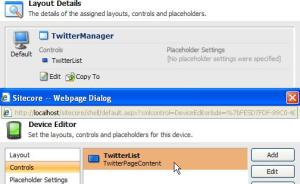
Here you can see the setup of device for the TwitterManagerPage template.

To display a list of twits, I’ve made a simple layout with a placeholder, that in my case  is used to display a rendering, which renders all the twit items in the global folder as a sorted list.

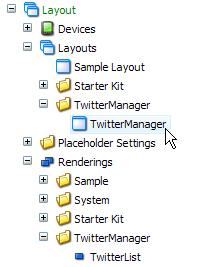
her you can see the layout and rendering associated with twitter manager.

I like to keep my things neat so i’ve added a TwitterManager folder to layouts rendering and templates folders (c:
If you want to try this twitter module you can download the package that i have made here.  Remember to read the readme file which explaines in further detail the content of the pakadge and the install procidure.

When the twitter module is installed and up  runing on your Sitecore solution, you should be able to se a list with twitter entries like this one (c:

Download

TwitterManager Package[33kb],   TwitterManager source code [3mb]

if you have any questions to the source code or the description above, fill free and ask (c:
XSLT bug, xslt removes html tags by it self

And this is a fact,.. I often use  HTML  when i make my renderings for Sitecore.  If yore not care-full,.. you can end up with a site which is not W3C compliant or even worse if it messes up your design,..

So her’s the problem,. if you type something like this in your XSLT
<div class=”separator”></div>

XSLT will only render the start tag, like so
<div class=”separator” >
Bummer,..

the only solution for this is to place some kind of content inside your empty tag
like a white space,.. But be careful to put &nbsp; inside your XSLT it will result in error. Use &#160 ; in stead (c:

happy coding

EDIT:
Another solution for this was proposed by Richard Willis, thanx body
change your <xsl:output method=”xml“>  to <xsl:output method=”html“>
that will instruct the render to format your output like HTML, like we want to..

How to programaticly update item fields in Sitecore

It is quaite streat forword, there is one thing thou that you should take notice of..
if you just get tour item from master database you can get up getting the wrong version of the item in a wrong language ,.. so this eksample will compile but jeald falsy results.

string guid ="{............}"
Database database = Factory.GetDatabase("master");
Item item = database.GetItem(guid);
item.Editing.BeginEdit();
 using(new EditContext(item))
 {
     item.Fields["fieldname"].Value = "new value";
}
item.Editing.EndEdit();

So to get the right version from the right language, you should do something like this.

Database database = Factory.GetDatabase("master");

Item item = database.GetItem(guid,Sitecore.Globalization.Language.Parse("da"),Sitecore.Data.Version.Latest);

item.Editing.BeginEdit();
 using(new EditContext(item))
 {
      item.Fields["fieldname"].Value = "new value";
 }
item.Editing.EndEdit();

Notice that i am using Sitecore.Globalization.Language.Parse(“da”) to get the language i wanted and Sitecore.Data.Version.Latest to get  the newserst version of my item. (c:

an that is all she wrote (c;

Performance tricks when developing Sitecore solutions

When developing you want your solution to be as streamlined as possible, you don’t want to save logs and media files. To cut down in the size of the Sitecore development environment this is what you can do.
Open your web confic and look for this bit:

      <!-- Agent to cleanup work files -->
      <agent type="Sitecore.Tasks.CleanupAgent" method="Run" interval="06:00:00">
        <!-- Specifies files to be cleaned up.
             If rolling="true", [minCount] and [maxCount] will be ignored.
             [minAge] and [maxAge] must be specified as [days.]hh:mm:ss. The default value
             of [minAge] is 30 minutes.
             [strategy]: number of files within hour, day, week, month, year
             [recursive=true|false]: descend folders?
        -->
        <files hint="raw:AddCommand">
          <remove folder="$(dataFolder)/logs" pattern="log.*.txt" maxCount="20" minAge="7.00:00:00" />
          <remove folder="$(dataFolder)/viewstate" pattern="*.txt" maxAge="2.00:00:00" recursive="true" />
          <remove folder="/App_Data/MediaCache" pattern="*.*" maxAge="90.00:00:00" recursive="true" />
        </files>
      </agent>

Change all maxAge atribute to 01:00:00, this wil remove all older files when this agent runs. No more gigabytes of log files to bloat up your solution ,.. sweat (c;

How to get image src from an Image field

I was wondering how to get at src atribute of an Image field in Sitecore,.. her’s an exsample of what data you can find in the Image field..

<image showineditor=”1″ mediaid=”{6WB581DF-395F-400B-A8F2-98690D18AD10}” mediapath=”/Images/yourImage” src=”~/media/Images/yourImage.ashx” />

so if you do a xsl value-of you’ll get this in stead of the image src,.. and that is just not what i wanted ,.. so to solve this you can do folowing

<xsl:value-of select=”sc:fld(‘imageFieldName’, . , ‘src’ )”/>

and thats it (c:

Web.confiq tips of the day (c:

if you want to define a special or multiple sites using sitecore ,.. this is the way to do it.

Open your Web.cinfig and look for “sites” attribute.  Here you can add your site definitions

It could look something like this ,..


<site name=”Mywebsite”  hostName=”www.somethingweb.dk”

virtualFolder=”/”

physicalFolder=”/”

rootPath=”/sitecore/content”

startItem=”/myweb”

database=”web”

domain=”sitecore”

allowDebug=”true”

cacheHtml=”true”

htmlCacheSize=”15MB”

enablePreview=”true”

enableWebEdit=”true”

enableDebugger=”true”

disableClientData=”false” 

language=”en” 

contentLanguage=”en”/>

Creating chunks in Sitecore 6

If you are thinking that this is the same as in Sitecore 53.. you are mistaken they have moved the ribbons and chunks to another place ,.. if you are looking in where they should be sitecore/sytem/ribbons/chunks, you’ll be pleasantly disappointed (c: Well do not displear you can find them at /sitecore/content/Applications/Content Editor/Ribbons/Chunks

her how Chris does it
Part 1: http://blog.wojciech.org/?p=79
Part 2: http://blog.wojciech.org/?p=82

How to populate dropdown with numbered values like years

Dude,.. I was playing arund with some xsl and was wondering how can you populate a dropdown menu with xsl,.. well it is no biggy,. this is how i did it ,..

first we have to calculate the number span lets say from this year to  50 years back ,..  with a recurcive template. Something like this:

<xsl:template name="yearList">
  <xsl:param name="year" />
  <xsl:variable name="lastYear" select="sc:year() - 50" />

  <option><xsl:value-of select="$year"/></option>

  <xsl:if test="$lastYear &lt; $year"><br />
    <xsl:call-template name="yearList"><br />
      <xsl:with-param name="year" select="$year - 1"/>
    </xsl:call-template>
  </xsl:if>
</xsl:template>

now we have to call the template with initial parameters.


<select>
  <xsl:call-template name="yearList">
    <xsl:with-param name="year">2009</xsl:with-param>
  </xsl:call-template>
</select>

thats it ,.. (c:

Split pipe separated string width XSLT ,..

Split pipe separated
string width XSL ,..


Ohh,. Boy that’s
the thing ,.. XSL does not include any method for this kind string operation ,..
So how would you solve getting items from a pipe separated string in sitecore,..
a pipe separated string looks something like this ,.. {Q2DCC7A2-DBB3-4A5F-BA84-56DL63C1C77F}|{DA493AD7-FD18-41AC-B14C-419D15AD101A}
so this is what I did and it works, I made a recursive iterator for this string.


<xsl:template name="split">


<xsl:param name="list" />

<xsl:variable name="newlist" select="concat(normalize-space($list), ' ')" />

<xsl:variable name="first" select="substring-before($newlist, '|')" />

<xsl:variable name="remaining" select="substring-after($newlist, '|')" />


<xsl:if test="$first = ''">


<xsl:value-of select="$newlist" /> Do your stuff …

</xsl:if>

<xsl:if test="$first != ''">


<xsl:value-of select="$first" /> Do your stuff …

</xsl:if>


<xsl:if test="$remaining">

<xsl:call-template name="split">

<xsl:with-param name="list" select="$remaining" />

</xsl:call-template>


</xsl:if>

</xsl:template>


Get your list and
you are done ,..


<xsl:call-template
name="split">

<xsl:with-param name="list" select="$LatestGUIDs"></xsl:with-param>

</xsl:call-template>


So this is the funny
part ,.. all of this can be done in a matter og seconds by using sc:Split(string,
XPathNodeIterator) , where string is a field name(which holds the pipe separated
string) and XPathNodeIterator is your node ,..


<xsl:for-each
select="sc:Split(‘field name ',.)">

Do your stuff…

</xsl:for-each>


XSLT atribute tip

If you want to add a class ore just toggle between two classes, there’s lots of ways to do this ,.. but I think this is by far the smartest way ,. (c:

<div>
   <xsl:if test="@id = $sc_item/ancestor-or-self::item/@id">
       <xsl:attribute name="class">active</xsl:attribute>
   </xsl:if>
   Blah ,blah ,.. mjau mjau ,..
<div>